Showing posts with label Techniques. Show all posts

Friday, November 16, 2012

Week #7 of Inspired Stamps 12 weeks of christmas tutorials: Altered Canvas


For the last 6 weeks the Inspired Stamps Blog has featured the Inspired Stamps 12 weeks of Christmas Tutorials.  Each member of the Design Team will be featured demonstrating how to create a special project.  This week #7 I am demonstrating how to create an altered canvas. 

Below are a few of the supplies I used to create my Altered Canvas.

My first step is to paint the canvas with CTMH Create-a-Shade Pearl Paint, tinted to my desired color using re-inkers.
For this canvas I mixed Holiday Red, Lilac Mist and Heavenly Blue Re-Inkers with the Create-a-Shade Paint to get my mauve-purple color.

Once I achieved my desired shade I painted my entire canvas, going over it first up and down then side to sidc to make sure the canvas was evenly covered.


Once my canvas has dried, I usually let it dry overnight. I will then start deciding what all I want to include on the canvas and start by laying out my embellies and papers trying to decide where I want to go with the look of the canvas.


Above you will see I chose a B&T piece from the La Bella Vie paper pack from CTMH, along with several rolled roses, cut using the Art Philosophy Cricut Cartridge, that I had laying around in my pre-made embellishment box.


I cut my B&T paper 5x4-1/2, then attached it to my canvas using Madge Podge.  I do coat both the back of the paper and the canvas before I lay my paper on the canvas.  Making sure that all corners of the paper are firmly sealed to the canvas.  I have taken my roller to my paper to make sure the paper is sealed.


Once my paper is sealed on I put a layer of Modge Podge over the entire Canvas, to seal it.

Once I have my B&T paper on my canvas I once again layout my embellishments to see if what I have pictured still will work, or if I need to make any changes.  I am a very visual person, and sometimes at this point I realize that what I had in mind isn't gonna work.  Checking it at this point before I start gluing down the embellishments helps prevent those "Oh, shoot" moments.  It is also at this point where I make sure my "frame" or "Focal Point" is the perfect size.
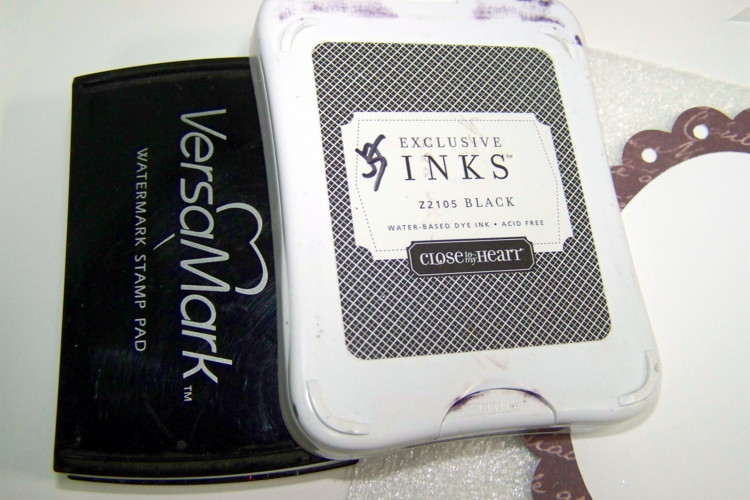
My next step I ink up my scripture in VersaMark ink and then in Black ink, before I stamp it onto my cardstock. I used Proverbs 3:5-7 from the Inspired Stamps "His Plans For You" stamp Set. I then coat it with Clear Detail Embossing Powder, and heat emboss, the image.  This prevents my water based ink from running when I coat it with Modge Podge.  Once the image as been heat embossed I adhere it to my canvas using Modge Podge 


Once I have my Scripture Focus glued on it is time to put the finishing embellishments onto my canvas.  Above I have used Modge Podge to adhere the branches and leaves to the canvas.  I adhered sparkles to the holes in my "frame".  I then let that layer dry and got ready for my final step.


The Final Step is to attach the rest of your embellishments, in my case the 3-D rolled Roses and Butterfly cut using the Art Philosophy Cricut Cartridge.  I use CTMH Liquid Glass to attach my large embellishments to my Canvas.


CTMH: Art Philosophy Cricut Cartridge, La Bella Vie Paper Pack, Black Ink, Holiday Red, Lilac Mist, Heavenly Blue Re-Inkers, Create-a-Shade Pearl Paint, White Daisy, Olive, Desert Sand, and Black Cardstock, Clear Sparkles, Clear Detail Embossing Powder, Prisma Glitter
Vellum by the Paper Co,, Modge Podge, Artist Stretched Canvas 5x7 from JoAnn's

Monday, August 13, 2012

Inspired Stamps Sneak Peek Week

It is New Release time over at Inspired Stamps, all this week the members of the Design Team will be giving you a "Sneak Peek" of the New Inspired Stamps that will be released for sale this Friday Aug 17 at Noon.  

Today Chere, Patty and I are giving you a Sneak Peek of the New Inspired Stamps "Feel Better".  I had lots of fun playing with this set, and I created 3 very different cards with it.


Last week, when we were to say what we felt our style was, I said "my style" changes depending on my mood.  Well last week was Clean and Simple, but this week is Whimsical, and Shabby.

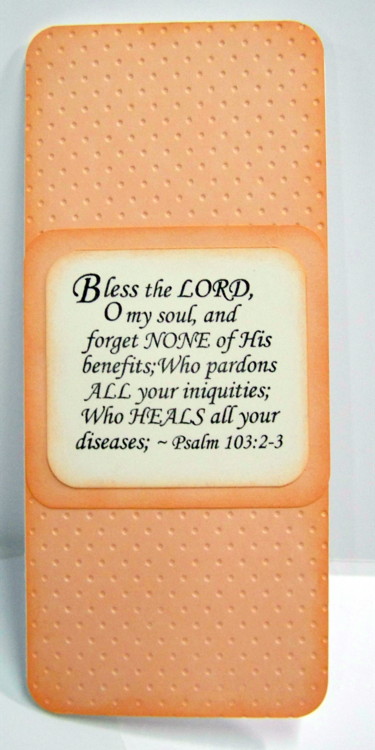
For my first card, I decided that the Band-Aid look would be perfect for a "Feel Better" stamp set.  Just think back when we were kids and had a scrapped knee usually all it took to make us feel better was a hug from Mom and a Band-Aid to show off.  So I pulled out my stamps, Cuttlebug, and card stock and this is what I came up.  
To create the band-aid holes I used my Swiss dots embossing folder and \
used the back side of the embossed cardstock.


My next card I decided to go a little shabby with, I was in a "De-Stressing" mood.  I also wanted to use the cute little band-aid stamp in the set to cover a paper tear. 


 These two cards remind me that while a band-aid and hug will help heal most physical wounds, God's love will heal all wounds!!! 

My next card looks like it has been through the wringer, It is tattered, distressed and completely a mess, but it still looks beautiful in my eyes.  This card for me represents that even though you may feel like the whole world is stomping on you, there is always that little bright spot of life showing through.  And that no matter what you always have someone "God" in your corner.

For this card I created my Flower image using emboss resist method on glossy cardstock. I first inked up my cardstock in yellows and oranges, then I stamped my flower image with Versa Mark ink and coated with embossing powder. Once my image was embossed I inked over the cardstock again with black creating the orange flowers with a black background, as the embossed image resisted the ink. After I had my black as dark as I wanted it, I covered the whole piece in Versa Mark and heat embossed it several times, to give it a Glassy look.

Now Jump on over to Chere and Patty's blogs to see what they have created using Inspired Stamps Feel Better Stamp Set.

Until Next Week 
Happy Scrappin

Jenn 


Materials Used:


Band-Aid card:
Inspired Stamps Feel Better
CTMH: Taffy and Colonial White Cardstock, Taffy and Black ink
Swiss Dots Cuttlebug embossing folder


Torn Card:
Inspired Stamps Feel Better
CTMH: Desert Sand, Colonial White, and Taffy cardstock,
Cocoa, Desert, Sand, Black and Cranberry Ink
 
 
Tattered Card 
Inspired Stamps Feel Better

CTMH: Desert Sand, Sunset, Coonial White CardstockDesert Sand, Black, Buttercup, Creme Brulee, Sunset, Goldrush, Autumn Terracotta inks.  Clear Detail embossing powder
Glossy Cardstock from Hallo's
Martha Stewart Lace.

Thursday, April 19, 2012

Flowers

This week the Inspired Stamps Design Team is focusing on combining Flower Stamps with a scripture.  I decided to once again create my own backgrounds using the Flowers stamp set.  I couldn't decided which card I wanted to make so this week you get to see 2 pieces of my artwork.

The first card is using a piece of the background paper I created in my April 5th post. I combined the Flowers Stamp Set background with the His Plans For You Stamp Set, to create this card. I love how the background turned out and am disappointed I only have 2 small scraps of it left. It has been really fun to play with and I am sure I will be making my own Background paper using this technique again real soon.


On my second card I used the Big Flower from the Flowers Stamp set to create the Key Lime and Sky background paper using the same color cardstock and ink stamping tone on tone.  I also took a piece of white cardstock and stamped it using Sky, Sunkiss Yellow and Hollyhock creating a colorful background paper.  I also used the His Plans For You Stamp set for the Scripture.


Materials for Both cards
Inspired Stamps Used: Flowers & His Plans For You

CTMH Materials used:  White Daisy, Sky, Key Lime cardstock, Tulip, Sunny Yellow, Pacifica, Sky, Key Lime, Sunkiss Yellow, Hollyhock, and black inks.  CTMH exclusive cricut cartridge Art Philosophy, CTMH Blue Buttons, Glitter Brads, Blush RicRac
Irredescent ribbon from stash.

Thanks For Looking, don't forget to visit the rest of the Design Teams blogs, the links are in  my sidebar.

Jenn

Thursday, April 5, 2012

Spring is in the Air

This week the Inspired Stamps Design team was asked to create something with a spring feel.  So I put on my thinking cap and decided that springtime means pastels and Graduations. (I just might have been influenced by the fact that my second son keeps reminding me that he will be graduating here in less than 2 months.)  So I created a graduation card using pastel colors.


Front of card


Inside of card
  For this card I used Inspired Stamps His Plans for You for the scripture and the sentiment.  I also used one other stamp set can you find it.  Here is a hint:

Close up of background paper

Yep, you guessed it I used the Flowers stamp set to create my own background paper. 

Background paper before I cut it up
 I used the Burned Batik technique to create my background. I took the big flower from the Flower set and stamped it in Versa Mark all over my cardstock, I then sprinkled it with embossing powder and heated the powder until it melted into the paper, this let the ink resist the embossed area but I had burnt the image into the paper so the glossy, raised embossed area was no longer there. I then used a sponge dauber to add my ink to the page using the lightest one first.  After it was inked up I sprayed my paper with my homemade glimmer mist to give it a little shine, and to help blend the ink. 

Materials Used:  Inspired Stamps Flowers and His Plans For You
CTMH materials used:  White Daisy, Key Lime, & Sky Cardstock
Tulip, Sunny Yellow, Indian Corn Blue, Amethyst and Black inks, Versa Mark ink, CTMH Clear Detail embossing powder, Just Blooms Flutter Paper Shapes (Butterflies), round clear Sparkles 
Ribbon from stash


Thanks for looking, please make sure you check out the rest of the design teams wonderful Spring ideas, by following their links in my sidebar.

Until Next Week Happy Stampin

Jenn

Thursday, March 1, 2012

Getting into shapes

This week over at Inspired Stamps we are getting into shape for March.  So I pulled out my Journal Shapes and Scenic View stamp sets and looked at their shapes instead of their design and worked on coming up with something out-of-the-box.  This is what I came up with.  I created this Easter card using the Shapes from the two stamp sets listed above can you tell where they were used?


Can you see where I used my shapes?  Remember I think outside of the box.  Okay here is a clue.


Yeap I stamped various shapes on the eggs with Versa Mark ink and then clear embossed them.  I then used the Emboss Resist technique and "colored" my eggs.  I used the Scenic View Stamp Set for the Purple, Light Pink, Green, and Yellow eggs, and Journal Shapes for the Dark Pink and Orange eggs.

I also used the grass stamp from Scenic View set to add texture to my grass, and for the sentiment.  I was going to redo a couple of the eggs, because of the stray pieces of embossing powder that speckled them, but my youngest so said they reminded him of the eggs they do when they use the "clear wax crayon" to decorate their eggs before they color them, so I had to leave them as is.

Material Used:  Inspired Stamps Journal Shapes and Scenic View
CTMH Materials used: Art Philosophy Cricut Cartridge, Clover Meadow, Hollyhock and White Daisy Cardstock, Clear Detail embossing Powder, Sky, Lagoon, Pear, Blush, Cotton Candy, Black, Orange, Sunflower and Gypsy Inks
Background paper is from a DCWV paper stack.

Thursday, January 19, 2012

Inspired Stamps Scripture and Nature Card

This week the Inspired Stamps Design Team, we are creating projects using Nature and Scripture Stamp.  This is what I came up with.  


I created a card using FlowersMark 10:27 and one other Nature Stamp.  Can you guess which one it was, look closely can you see the other Nature Stamp?


You still can't....Here is a clue...

Still can't place it, remember that you don't always have to use the whole stamp or even use it as the designer intended it to be used.  Often times, people get stuck into the same old rut using the same stamps over and over the same way.  As I was laying out my card I decided that the Colonial White needed something more to it to give it a little life.   Looking through my Inspired Stamps, I just couldn't find a stamp I thought would add that pop to the background.  That is when I decided to think outside the box, and slowly went through my stamps, not looking at the picture of the stamp but the texture of the stamp.  When I looked at this stamp I realized it could be stamped all around the page to create a "wooden" frame around the 3 squares.

Have you figured it out yet????   It is the Tree from the Ask, Seek, Knock stamp set, pictured below.  


Can you see it now?

Hope you all enjoyed my artwork.  Please make sure you visit the other Design Team Members blogs to see what creative projects they have come up with this week.


Until next week, Happy Scrapppin.


Materials used:  Inspired Stamps FlowersMark 10:27Ask, Seek, Knock
CTMH Materials: Key To My Heart B&T, Colonial White, Creme Brulee, and Tulip cardstock, Black & Juniper Ink, Edge Distresser,
Queen & Co: Black Pearls


Monday, January 9, 2012

Sneak Peek Week at Inspired Stamps with Random Stamping

This Friday at noon the Inspired Stamps online Store will be releasing New Stamps.  So this week Antoinette and the rest of the Design Team are giving you a sneak peek at the upcoming New Releases on the Inspired Stamps blog. So make sure you check in everyday so you can get a sneak peek at all the new stamps. 

Today I am showcasing the new Label Maker Words and Journal Shapes.  When I first saw these stamp sets my creative brain immediately screamed Random Stamping (RS).  The wonderful thing about stamping is that if you can't find a paper to fit your mood, you can instantly create your own using a couple of stamps, your favorite colors and a sheet of cardstock.  Here are the 2 background papers I created using random stamping.


For this background paper I individually stamped each word from the Label Maker Words Stamp Set on the Card stock, making sure to intentionally stagger each row to give it a brick like appearance. If you notice all the words are the same color with an exception of three that I wanted to stand out.

Here is the Simple Valentine/Love Card I created using this RS Background Paper. 

On this next piece of RS cardstock, I stamped some of the shapes from Jounal Shapes in different colors on the page.  This paper looks very busy now but once it is on the card the other elements will help tone it down.

Here is the simple Birthday card I created using this RS background cardstock.  I also used Deuteronomy 31:8, 1" Circle Sentiments, and Label Maker Alphabet to complete this card.


 For this next background paper is made using a process I call wordblocking, I took my acrylic block and placed all my stamps I wanted to use on the block and the inked them all up at once and stamped on my cardstock, alternating the direction of the block to change up the design some.

Here is the block showing how I placed words from both the Label Maker Words  and Journal Shapes stamp sets on my acrylic block.

Here is the Hi! card I created using this background paper.  If you notice the blue squares are also random stamped, the Sky pieces were stamped using the wordblock, used on the background.  the Pacifica pieces were random stamped using the swirl stamp from Journal Shapes.  I used More Perfect Sentiments to finish of this card.

Hope you enjoyed this sneak peek of the Inspired Stamps New Releases.  Remember this is going on all week so make sure you keep checking out the Inspired Stamps Blog, and the rest of the Design Teams blogs linked in the left hand bar of my blog.  If you see any stamps you like they will be on sale here starting at noon on Friday January 13.


Materials used: Inspired Stamps Label Maker Words
CTMH items: Sophia B&T, Tulip, & White Daisy Cardstock,
Blush, & Tulip ink, Tulip Velvet ribbon, CTMH Exclusive Art Philosophy Cricut Cartridge
the script was printed on  my computer.


Materials used: Inspired Stamps Journal Shapes, Deuteronomy 31:8, 1" Circle Sentiments, Label Maker Alphabet
CTMH items: Sophia B&T, Chocolate, & White Daisy Cardstock,
Blush, Pear, Dutch Blue, Black and Creme Brulee ink, CTMH Exclusive Art Philosophy Cricut Cartridge
chocolate ribbon from JoAnn's 


Materials used: Inspired Stamps Journal Shapes, Label Maker Words, More Perfect sentiments
CTMH items: Pacifica, Sky & White Daisy Cardstock,
Dutch Blue, Sky and Pacifica ink, 
Silver ribbon from stash 


Thursday, December 8, 2011

Inspired Stamps Christmas Card

Christmas is fast approaching and I haven't come up with my Christmas card design for this year.  I have made several sample cards but have yet come up with on I feel will be easy to make and I want to make more of.  This weeks Inspired Stamps Design Team work is one of my samples.  I have used both the Blessed Little Christmas and Vintage Christmas stamp sets. 

With this card I was going for quick and simple. I achieved that with the solid B&T background, lace and sentiment, but when  it came to the Poinsettia, I failed. It might be fairly easy to make (thanks to the Cricut) but it is not quick as the scoring of all those petals takes time. The inside was fairly simple until I decided it needed a little bit more and Masked the Merry Christmas from the wisemen from the Vintage Christmas set.  I masked out the Merry Christmas by putting tape over the part I wanted removed from the image, then inked up my image, once it was all inked I removed the tape and stamped the image.  The tape prevented the ink from covering the unwanted parts and therefore it didn't appear when i stamped it. 


At the rate I am going I will not have a batch of matching Christmas cards done in time to give out for Christmas, but with as many samples as I have made I should have enough ready to give everyone their own unique card, which might be the way I go anyhow.  Check back next week to see another sample for my Christmas cards.

Don't forget to check out what the rest of the Design Team created for you this week.  Links to their blogs are in the sidebar of my blog.

Materials used: Inspired stamps - Blessed Little Christmas, Vintage Christmas
CTMH Products used - Aspen B&T, White Daisy Cardstock
Crystal Blue & Outdoor Denim Ink
Glitz Glitter Gel-Silver
Clear Sparkles (colored with Yellow Permanent Marker)
CTMH Exclussive Art Philosophy Cricut Cartridge
Martha Stewart Lace
DCWV Glitter Stack green cardstock

Thursday, October 6, 2011

Inspired Stamps Designers Choice artwork

This week over that the Inspired Stamps Blog, it is a Designer's Choice Week, meaning we can create anything our hearts desire.  For my design I have created another 5x5 canvas, using the His Plan's For You Stamps Set.


I have fallen in love with creating these tiny canvas projects.  They are so easy to create and make great gifts.  This canvas was actuallyone of the many items I entered into our County Fair stamping competition.  This one was entered in the Embellished artwork catagory and it took second place.  It combines my favorite things,  One of my favorite and most used Inspired Stamps Set His Plan's For You Stamps Set, hand rolled flowers, Cricut die cuts, glitter and butterflies.


Close up of the Flowers

Close up of the butterfly.  To Create this butterfly, I used packaging tape to
gently lift off the negative image left on my cricut mat.  Once the entie image was off the mat
and stuck to my tape I sprinkled the whole thing with Prisma Glitter
and then covered the back with another piece of packaging tape.
I then taped this glitter butterfly onto a solid cardstock butterfly
and cut it out of the tape.


Materials used:  Inspired Stamps His Plans For You
CTMH Products used:  Roxie Paper pack, Black, Colonial White cardstock, CTMH Exclusive Art Philosophy Cricut Cartridge, Mocha Opaques, Prisma Glitter, Black, Desert Sand, and Smoothie Inks, Smoothie Re-inker, Create a Shade Pearl Paint, Versa Mark Ink, Clear Detail Embosing Powder, Liquid Glass
JoAnn's- 5x5 Canvas
Other - Packaging Tape

For those who were looking for an update from my vacation, it is coming, things have been just a little crazy around here with 2 boys getting sick, one starting college, and one getting ready for his first homecoming dance, not to mention football and all the other normal fall activities.  All this means mom doesn't get any time to play.