Saturday, October 30, 2010

Card Class At Warren Township community Center

I am hosting a Card Class at the Warren Township Community Center, on November 9 at 6:00pm.  So I have been playing around with my stamps trying to come up with some simple yet great looking cards for everyone to make.  I had already decided on what paper packs I was going to use Mistletoe & Magnifique. 

I quickly came up with the Mistletoe cards posted here.  I had a gathering last week and needed something to WOW veteran wood Stampers so of course I was going to use an image that had a base & shade stamp, so that they could CLEARLY see the difference between our clear acrylic and the traditional wood stamps. They will have their choice of either making one of each design or 2 of one.


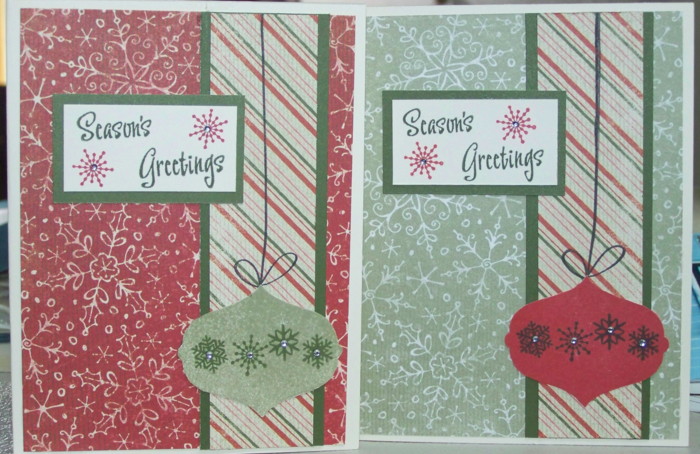
Materials Used All CTMH: Mistletoe Bulk
Colonial White, New England Ivy White Daisy Cardstock
Holiday Trinkets Stamp set
Bitty Sparkles
Inks: Cranberry, New England Ivy, Garden Green, Black


The Magnifique card was the one that had me stumped.  Try as I might I couldn't come up with anything, then Christine Adams a fellow consultant posted her cards for her workshop and her cards got my creative juices flowing.   You can see her cards here http://creatingwithchristine.blogspot.com/2010/10/christmas-card-workshops.html.  So I got out my Magnifique Papers and started playing, here is what I came up with.  THANKS CHRISTINE for the inspiration.


'This is all of the cards I came up with
the hard part was deciding which one I wanted to use for the class.
All 4 used Magnifique Paper, Pacifica, Sky, White Daisy and Outdoor Denim Cardstock
Sky, & Pacifica Ink
Irrededscent ribbon by Darcie


Stamp Set Holiday Trinkets, Navy Ribbon from Jo-Anns & Licories Opaques
Our corner rounder to make the scallops
I love this one but since I had already used the Holiday Trinkets stamp set
 on the Mistletoe card I decided not to use this one.


This one uses A Timber, Bitty Sparkles and our corner rounder to make the scallops,
I like this one but didn't love it as much as the ornament.


This one uses A Timber, Bitty Sparkles and our corner rounder to make the scallops,
I like this one too but still didn't love it as much as the ornament.


WE HAVE OUR WINNER!!!

This one uses A Timber, Bitty Sparkles
I used a fiskars border puch to create the lace look of the White daisy & Outdoor Denim
then instead of the gifts I used the border in both sky & pacifica


So here are the 4 cards you can make if you come to the Warren Township Community Center on November 9 at 6 pm.  You only pay $5.00 to make 4 cards, 2 each of the 2 designs.  Plus I am offering each additional card made for $1.00.


You can make these 4 cards for $5.00.
 

Wednesday, October 20, 2010

It's finally clean!!!!!!

Well after over a week of my scrapbook room being a total wreck (see pictures of room in post below), and me slowly putting it back into place cause of bum leg and back. it is FINALLY CLEAN!!!!!  I still need to put in the finishing touches but It is clean enough to work on and I have already worked on a couple of pages.  I now can't wait to mess it up again.  Then again maybe I should try to practice putting things away when I am done with them instead of just laying them on the first open space I find. LOL

Here is the clean version of my scrap area.
The new and improved view from the office, if you notice
all 3 table tops are relatively clean
This shelving unit holds my scrapbooks, misc idea books,
Markers, Colored Pencils, chipboard letters & other misc items

This is where I store all my scrap pieces of cardstock
I have each drawer labeled with season and colors
and then in the drawers I have bags for each season or if it is a color I use alot
like chocolate or outdoor denim they have their own bag
The green tower in this picture is a stamp set holder my
husband made 4 me using an old spice rack turntable

These drawers hold my non CTMH paper (2 black towers),
my stamp sets, and my Ribbon & Embelishments

the wooden bookshelves hold my non-Ctmh 8.5x11 paper,
the white box holds my Ctmh B&T scraps


My main workspace as you can see I have already started to mess it up again
My tool caddy, I filledthe bottom with rice so every thing stands up
MyCTMH  paper and E size stamp storage

Monday, October 18, 2010

WHAT A MESS!!!!!!

In aftermath of the chaos to get lots of cards and other items done for the fair, my scrapbook area has begun to look like a hurricane hit it.  My husband and kids think it should be condemmed.  Me on the other hand realizes that it is just a by product of my extremely creative and disorganized mind.  My area is actually in our hobby room I share with my husband, who uses his area for leather working, reloading, gun cleaning and several other hobbies he pursues.  Of course my area is strictly dedicated to my scrapbooking and papercrafting.  Though we are sharing the room, my side has gotten so bad with tools, papers, ideas and other items completely covering every available flat space, I was starting to over flow into Ken's area.  So 2 Saturday's ago I started the painful process of doing a deep cleaning of my area.  I started by moving everything out away from the walls, piling it in the hallway and on Ken's side and then mopping my half off the floor.  A girl's got to get the glitter off the concrete some how.  LOL   Well since then I have slowly been moving things back to place, I say slowly because I managed to injure my hip and lowback on Monday and have been unable to sit or stand for long periods of time since.  Ken has been pushing me to get the job finished since most of my stuff is now in his area, so he can't work on any  of his projects.  Of course he is also accusing me of taking over his side of the room, especially since everything was so bad that if I needed a flat space to work i would pull up to one of his benches LOL.  I am in the process of finishing the cleaning so I will post those pictures later, until then this is what EXTREMELY  MESSY looks like.

This is looking in the room from my office.  The first table is actually one Ken uses to cut his leather on, but as you can see I have overtaken it for now.  The white box you see is where I place my flowers or other items when i am going crazy with my homemade glimmer mist.

This is one of my work tables, it is fairly clean in this picture cause I had taken it down and used it at the fair.  Of course once I Set it back up it became a clutter magnet again.  The back wall is where my non-ctmh paper storage is at along with my stampsets and other misc items. 

These shelves are suppossed to hold my tools and supplies so I have everything at my finger tips.  The problem is I often get things out and fail to properly put them away.

This table is my main work station.  As you can see there is not an inch of real estate available to work on as i just keep throwing things on top of the piles instead of putting it away.  Did I mention that I am very messy when I am in that creative mode.

This is the resemblance of organization i have right now in my area.  This is where I keep all my CTMH cardstock and paper packs.  The cardstock is all kept in plactic bags to keep it from getting dusty and kept in Season order (my way of learning what color goes in what season).  The paper packs are just randomly put in an empty slot, so I can look through them when needed.

This is Ken's side of the room, if you notice he has everything in its place and actually goes nuts if anyone moves his stuff out of place.  The radio on the corner is mine as is the papers in the middle of the work space.  Though I ain't taking over this room at all.

My favorite way to emboss....Embossing on Vellum

As I stated in my earlier post the gals over at Heart 2 Heart Challenges are having an embossing challenge.  Since Embossing is my all time favorite way to embellish items I am submitting several of my projects. 

My favorite way to emboss is to emboss an image on vellum and then cut out and use as an embellishment.  Once I have embossed the image I rub ink over the image so it resists the embossed area but gives the negative area a touch of color.  In today's example I stamped the butterfly from the Dreams Petite Perks Stamp set in Black and Versa Mark then sprinkled it with an Irredescent embossing powder ( I have also used CTMH Clear Detail EP and Prisma Glitter Combined to geet a similar effect) I then gently heated to melt the powder, holding the gun far enough away to heat the image but not burn the vellum.  Once it was melted I sponged Orange over the embossed images to get my emboss resist look.  Then I gently cut out the butterflies including the antennea, (I cut out 18 of these without losing a single antennea).  On my card for the first one I stamped the butterflies in chocolate on my background then applied liquid glass just to the body & antennea only.  I placed these over the stamped image and once it had dried I gently raised the butterfly wings up so it looks like the butterflies are flying off the page.  Of course once I got started I had to make several more butterfly cards.


Paper Used: Twitterpatted, Chcolate, and Colonial White Cardstock, Vellum

Stamp Sets: Treasure Life, & Dreams Petite Perks

Inks: Creme Brulee, Chcolate, Sorbet, Black, Versa Mark

Hallographic Embossing Prowder from Ranger


Close Up of Butterflies

Additional cards made using the embossed butterflies

H2H Challenge Embossing

This week the challenge over at Heart 2 Heart Challenges is Embossing.  Well since this is my favorite way to embellish items I figured I would enter several of my past projects.  I have nothing new right now cause I am in the middle of a major cleaning of my scrap area.  Since I have several projects I would like to enter I  will be posting several times today.

Here is my first contribution, it uses embossing in 2 ways. The first is dry embossing with sanding.  I scored (dry embossed) my paper every 1/4 inch then i sanded over the raised areas to make them stand out.  The next technique is called ghosting (I think) i found it in the CTMH "Wishes" Card confidence program.  I first heat embossed the mountain scene using Clear Embossing powder then I inked over the embossed area with desert sand, so the embossed area would stand out.  Next I took a piece of paper and placed over the image and ran over it with a hot iron until all my embossing area was on transfered onto the paper. My final piece has no raised embossed area as I "ghosted' it away.

Materials Used:
Barn Red, Colonial White & Twilight Cardstock
Sarsaparilla Paper Pack (my Favorite hated to see it retire)
Clear Detail Embossing Powder
Twill
copper brad from JoAnns
Stamp Sets: Beauty Seen, & Say it with Style